
Thank you for visiting RV Ramblings, the daily happenings of full-time RVers, James and J, as told by James.
You may share this particular blog entry by referring to www.rvramblings.com/?date=2010-06-16.
Visit www.rvramblings.com to view the latest blog entry. Click here to create a bookmark that will take you to the latest blog entry.
June 16, 2010, a Wednesday
Pawnee National Grassland, Colorado, USA
— Upgraded to Photoshop CS5 and photographed a Swift Fox Kit
We awoke around 6:00 as cows were rocking the RV. They were scratching themselves on the ladder, the steps, and the side-view mirrors. We are boondocking where cows can free-range, and this is the first time we've had them around. I had a bowl of Post Raisin Bran and made instant coffee to go.
We entered the blind around 6:45 and it was calm and clear. We waited for the Swift Foxes, and waited, and waited. No foxes. We left the blind around 9:00.
After we returned to the RV, I took a shower and checked email. Then we packed up our computers and left in the Jeep around 10:05.
We went to the Ace Hardware in Eaton to get some wire to reattach the carpet on the lowest step of the RV that the cows had knocked loose.
Then we went to Eaton Shipping so J could ship off some Epson paper that she had sold on eBay.
We went to Grey's Café in Ault around 11:00 for lunch and free WiFi. J had a BLT and I had a BLT on steroids, aka a Club Sandwich. We each downloaded system updates for our MacBook Pros, and generally enjoyed the fast, free WiFi connection. We left around 1:00.
The basic installation wasn't too painful, and I was eager to start processing images. As soon as I opened up an image in Photoshop CS5, I ran into trouble — the View > Screen Mode > Maximized Screen Mode no longer exists! I worked in that mode all the time, and it really speeded up my workflow. Maximized Screen Mode is particularly useful when working with two monitors because it makes the image window as big as the monitor and has the usual file name at the top and the color space (or other information) display at the bottom left and most importantly it has scroll bars on the right and bottom. In Maximized Screen Mode, after being zoomed in to 100%, hitting View > Fit on Screen (Cmd 0) makes the complete image visible in the window that hasn't changed size, and then hitting View > Zoom Out (Cmd -) reduces the image to the next standard Photoshop size (like 33% or 25%) with a little gray all around the image. Without Maximized Screen Mode, I'll have to manually make the window as big as possible, and then after zooming into 100%, I'll have to repeatedly hit Cmd - to see the whole image, and I'll have to pay attention to figure out how many times to hit it — previously, it was always just Cmd 0 followed by Cmd - — no thinking required.
Then I ran into the new adjustments panel, something that wasn't inflicted on me before because I bypassed CS4. In CS3 and before, when adding or editing an adjustment layer, a dialogue window would open up that was easy to read and work with. The default adjustment panels are small, and even when changed to Enhanced View, they are hard to work with: the simple text buttons have been replaced by obscure icons, and the contrast in the panel is really low (dark gray on light gray) so the whole thing just looks messy. Oddly, the old adjustment dialog windows still appeared when I ran my actions, so I submitted a Feature Request to Adobe to suggest that maybe a preference could be set so that either the adjustment panel or the old dialogue windows would be displayed. Later in the day, I heard back from Adobe and was given a kludgy workaround at least for Curves adjustment layers. There's a spacial panel addition that will let you create or edit a Curves adjustment layer through the old dialogue window, but you have to click on the buttons on the special panel each time — you can no longer double-click on the Curves adjustment layer icon — what a PITA!
Then I encountered some good news: Photoshop CS5 does in fact run my basic processing action much faster than CS3. :) So, maybe some day CS5 will actually improve my workflow. Then I ran into more difficulty. The File > File Info... (Exif) window has been reworked and screwed up. In the old Description panel, there was a popup menu that contained Exif templates, and after a template was selected, it would be applied. Now, after selecting a template, you have to tell it how to apply the template: 1) Clear existing properties and replace with template properties, 2) Keep original metadata, but replace matching properties from template, or 3) Keep original metadata, but append matching properties from template. One slight improvement is that the new pop-up menu has the previously-selected template selected, so if a template is used again and again, at least you no longer have to scroll through the list of saved templates, so they got something right to improve productivity. It was also possible to access recently-used Document Titles via a popup menu, and that's no longer possible. It was a great way for me to title the file when processing lots of images because I could just reuse a title as is, or borrow a previously-used title and then edit it. Now I'll have to enter a title from scratch each time — what a great productivity enhancement. Then I ran into another snag. The Exif window always opens up on top of the image I'm editing when I first launch Photoshop — it doesn't remember that I want to have the window appear on top of the panels on my second monitor.
Similarly, the File > Save As... dialogue box always opens on top of the image window the first time Photoshop is opened — it doesn't remember that you put it over on top of the panels on the other monitor like it used to do. This screws up the script I use in iKey to automatically save a file when I'm done processing it the first time because the window's not in the correct place so it doesn't know where to move the mouse to change the file name by appending "_work" and then change the format from TIFF to Photoshop. The final problem I discovered is that the Scripts > Fit Image... has been replaced by Automate > Fit Image..., so my actions to create images sized by pixel dimension had to be fixed, and I'll have to fix more actions that are for different pixel dimensions too — I just love Progress!
Because I was so pissed at wasting time fighting with the new-and-improved Photoshop, J suggested that I could cook to get my mind off of it.
We had dinner around 6:05 of Lloyd's Pork BBQ and a Greek salad. Cooking dinner did help reduce my stress level a little, mainly I think because I didn't have the opportunity to find anything else wrong with Photoshop CS5.
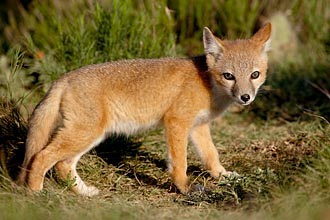 We went out to the blind around 6:45, and one kit was out. We got some nice shots of it in decent light before it went down into its den when a car went by around 7:00. We waited for it and its siblings to come back out, then waited some more. We even waited after the sun had set behind a low cloud bank to the west, hoping that they would come out like they did last night. No foxes.
We returned to the RV around 8:35 and I downloaded the images I took, then downselected them in first in iView then in Capture One (C1). Then I selected an image for the blog and processed it.
We entered the blind around 6:45 and it was calm and clear. We waited for the Swift Foxes, and waited, and waited. No foxes. We left the blind around 9:00.
After we returned to the RV, I took a shower and checked email. Then we packed up our computers and left in the Jeep around 10:05.
We went to the Ace Hardware in Eaton to get some wire to reattach the carpet on the lowest step of the RV that the cows had knocked loose.
Then we went to Eaton Shipping so J could ship off some Epson paper that she had sold on eBay.
We went to Grey's Café in Ault around 11:00 for lunch and free WiFi. J had a BLT and I had a BLT on steroids, aka a Club Sandwich. We each downloaded system updates for our MacBook Pros, and generally enjoyed the fast, free WiFi connection. We left around 1:00.
Upgraded to Photoshop CS5
We returned to the RV and I upgraded my Photoshop from CS3 to CS5. There weren't any improvements in CS4 that I needed so I didn't upgrade to it, but the Content-Aware Spot Healing Brush Tool and HDR Pro capabilities of CS5 would be useful. Before upgrading, I saved all of my actions, tool presets, and menu shortcuts, then made screen shots of my two workspaces so I could duplicate my palette layouts. (I have one workspace for when I'm working on just my laptop and one workspace for when I'm using a second monitor too.) Then I deleted CS3. I did that because I would be upgrading using a slightly unorthodox procedure. Because J had purchased CS4 shortly after CS5 was released, she got CS5 for free. However, to upgrade to CS5, you have to start with CS4, so if the installation package saw my old CS3, it wouldn't like it. I installed CS5 with no problem, then loaded my actions, tool presets, and menu shortcuts. Then I struggled to get my workspaces set up. While the capability to drag palettes around individually or in groups is pretty cool, the interface isn't very intuitive and I always have trouble getting my palettes set up the way I like them when I upgrade. Bridge CS5 also got installed as part of the upgrade, and it picked up my workspaces just fine, but I had to tweak the information that was displayed in the Metadata panel.The basic installation wasn't too painful, and I was eager to start processing images. As soon as I opened up an image in Photoshop CS5, I ran into trouble — the View > Screen Mode > Maximized Screen Mode no longer exists! I worked in that mode all the time, and it really speeded up my workflow. Maximized Screen Mode is particularly useful when working with two monitors because it makes the image window as big as the monitor and has the usual file name at the top and the color space (or other information) display at the bottom left and most importantly it has scroll bars on the right and bottom. In Maximized Screen Mode, after being zoomed in to 100%, hitting View > Fit on Screen (Cmd 0) makes the complete image visible in the window that hasn't changed size, and then hitting View > Zoom Out (Cmd -) reduces the image to the next standard Photoshop size (like 33% or 25%) with a little gray all around the image. Without Maximized Screen Mode, I'll have to manually make the window as big as possible, and then after zooming into 100%, I'll have to repeatedly hit Cmd - to see the whole image, and I'll have to pay attention to figure out how many times to hit it — previously, it was always just Cmd 0 followed by Cmd - — no thinking required.
Then I ran into the new adjustments panel, something that wasn't inflicted on me before because I bypassed CS4. In CS3 and before, when adding or editing an adjustment layer, a dialogue window would open up that was easy to read and work with. The default adjustment panels are small, and even when changed to Enhanced View, they are hard to work with: the simple text buttons have been replaced by obscure icons, and the contrast in the panel is really low (dark gray on light gray) so the whole thing just looks messy. Oddly, the old adjustment dialog windows still appeared when I ran my actions, so I submitted a Feature Request to Adobe to suggest that maybe a preference could be set so that either the adjustment panel or the old dialogue windows would be displayed. Later in the day, I heard back from Adobe and was given a kludgy workaround at least for Curves adjustment layers. There's a spacial panel addition that will let you create or edit a Curves adjustment layer through the old dialogue window, but you have to click on the buttons on the special panel each time — you can no longer double-click on the Curves adjustment layer icon — what a PITA!
Then I encountered some good news: Photoshop CS5 does in fact run my basic processing action much faster than CS3. :) So, maybe some day CS5 will actually improve my workflow. Then I ran into more difficulty. The File > File Info... (Exif) window has been reworked and screwed up. In the old Description panel, there was a popup menu that contained Exif templates, and after a template was selected, it would be applied. Now, after selecting a template, you have to tell it how to apply the template: 1) Clear existing properties and replace with template properties, 2) Keep original metadata, but replace matching properties from template, or 3) Keep original metadata, but append matching properties from template. One slight improvement is that the new pop-up menu has the previously-selected template selected, so if a template is used again and again, at least you no longer have to scroll through the list of saved templates, so they got something right to improve productivity. It was also possible to access recently-used Document Titles via a popup menu, and that's no longer possible. It was a great way for me to title the file when processing lots of images because I could just reuse a title as is, or borrow a previously-used title and then edit it. Now I'll have to enter a title from scratch each time — what a great productivity enhancement. Then I ran into another snag. The Exif window always opens up on top of the image I'm editing when I first launch Photoshop — it doesn't remember that I want to have the window appear on top of the panels on my second monitor.
Similarly, the File > Save As... dialogue box always opens on top of the image window the first time Photoshop is opened — it doesn't remember that you put it over on top of the panels on the other monitor like it used to do. This screws up the script I use in iKey to automatically save a file when I'm done processing it the first time because the window's not in the correct place so it doesn't know where to move the mouse to change the file name by appending "_work" and then change the format from TIFF to Photoshop. The final problem I discovered is that the Scripts > Fit Image... has been replaced by Automate > Fit Image..., so my actions to create images sized by pixel dimension had to be fixed, and I'll have to fix more actions that are for different pixel dimensions too — I just love Progress!
Because I was so pissed at wasting time fighting with the new-and-improved Photoshop, J suggested that I could cook to get my mind off of it.
We had dinner around 6:05 of Lloyd's Pork BBQ and a Greek salad. Cooking dinner did help reduce my stress level a little, mainly I think because I didn't have the opportunity to find anything else wrong with Photoshop CS5.
Swift Fox Kit
Pawnee National Grassland, Colorado, USA
Canon EOS 1D Mk III, 500 f4 & 1.4x,
1/1000 sec, f8, ISO 400
1/1000 sec, f8, ISO 400
We returned to the RV around 8:35 and I downloaded the images I took, then downselected them in first in iView then in Capture One (C1). Then I selected an image for the blog and processed it.